Smokin-It Temperature Contoller Bypass

Yikes!!!!

I had to get itchy again. I realized a couple days later that when I was buttoning up the back of the unit I didn't tuck the wires outboard the middle layer of insulation!!!!

Minor fix really and not certain it would be an issue but I want them away from the interior and like it was from the factory.  BUT I could only confirm I made this hasty error by looking at the photos I took here!!!!

I will now be happy not to see that yellow fiberglass from itchy-central.
 
I'm assuming you're changing the power cord on your Auber, if yes, and the length is less than 50 ft., it does not matter what you select as both are rated the same.

Current for Power Extension Cords  (always uncoil the cord completely under oreration) 
 
14 / 3 AWG Cable
Length Current
50' 15 A
100' 13 A
 
12 / 3 AWG Cable 
Length Current
50' 15 A
100' 15 A

SI#2 has a 700W element. OnCurrent is ~6A.
SI#3 has a 1200W element. OnCurrent is ~10A.

You have enough headroom.

Hope this helps.
 
Thanks for the info, Steve!  That answered a couple of questions I had, too.  Great having an engineer on staff! ;D
 
I finished my toggle switch bypass.  I LIKE IT!  I would recommend this to anybody that is bypassing the controller, providing they feel up to the task.

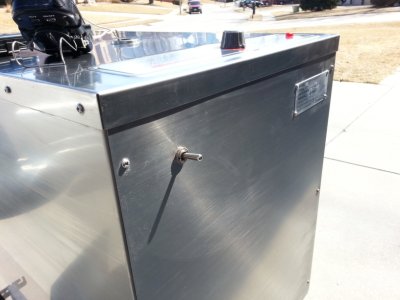
I put mine on the back of my unit in the upper left corner as you look at the back of the unit.  I positioned it "horizontally" so that if I flip it toward the stock controller, the controller is inline.  If I flip it away from the controller, it is bypassed.  I chose to put it on the back because I could put the back plate in a drill press and get a clean hole drilled.  It's a nice clean look.

The reason I went the switch route over my previous direct bypass is because I had a bad probe on my Auber.  Those that use Aubers, know that if you don't have two probes plugged into it, it won't work.  I had a 15 lb brisket all ready to go and realized I had a bad probe.  I had to tear apart my SI #3 to remove my bypass so that I could cook. 

With the switch in place, I can start cooking with the flip of the switch, in the event of an auber failure. 

I still haven't ordered my replacement probe and wanted to cook some chicken today.  I was worried about rubbery skin because I like to finish my chicken at around 275 degrees and my stock controller won't get close to that.  BUT with the switch, I can flip over to the bypass a few times at the end of the cook and get the temps up to crisp the skin. 

So glad I went this route.  I could almost accomplish some of the things I bought the Auber for with this simple switch.  Sure, I would have to monitor it and flip back and forth a couple of times, but that's still easier than managing my stick burner.

Thanks for the great idea, Steve! 

Oh, and while I had it tore apart, I put a 4' cold weather cord on it.  Another very nice idea and addition.


Attachments

  • 20140323_131032.jpg
    20140323_131032.jpg
    166.8 KB · Views: 652
  • 20140323_131050.jpg
    20140323_131050.jpg
    219.2 KB · Views: 668
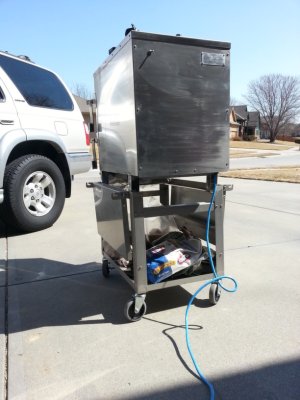
Pics attached now.  And yes...  both mods are well worth it.

You can see on the back that I'm not done cleaning it.  That's my next project.  I started cleaning the exterior of the box with steel wool.  I haven't finished yet.  You can kinda see how nice the top turned out.  I have decals on the way but I can't share that yet.  When I get it done, I will post up pictures.  It's going to be a month or so.  I don't have that kinda time on my hands.
 
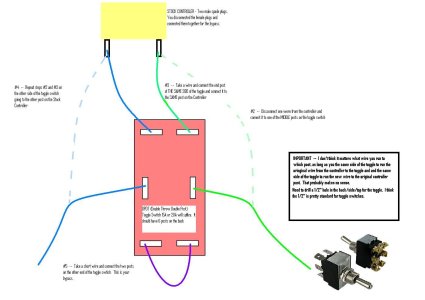
Jeff - This is my high end wiring diagram for the toggle switch.  Call me if it doesn't make sense.


Attachments

  • toggle bypass.JPG
    toggle bypass.JPG
    107.5 KB · Views: 880
Great diagram, Rick.  That really explains the bypass switch process well.  I've been considering this, so this is good timing!  Thanks!
 
Thanks Rick.  This is great.  I think even I can do it now with this diagram.  Thank you for your ultra quick response to my request too.  Great helpful people on this forum!  I hope sometime I can be as helpful to somebody as the rest of you have been to me.
 
Rick ... That is the same switch I used... Nice diagram.

That said if you ever leave the switch in the bypass mode accidentally and no Auber ... The unit will run full on and bad things may happen... So always check the position. 

I bought the missile launcher cover for a couple bucks to ensure whenever you close the cover it automatically puts the switch back in the stock position. It's a small safety feature to help me from accidentally zapping the unit.
 
I have a missile launcher and that was my original intent.  But given I placed it on the back, it just looks a little weird.  So on the back of the smoker, I like my left/right orientation.  If I would have had the cajones to drill into the top, I would have gone with the missile launcher look.
 
cwshiles said:
Polish Q said:
Curious why the aluminum foil is left hanging out the front?

Thanks Steve and Sarge!

That is my fully patented DripStop-o-Matic!  ;D

I actually got tired of dripping juices (cooked or raw) on the deck.  The dogs like it, but it stains, so I do not.  It does not catch them all, but if I pull the racks out a little to check the cook, it is enough that it catches some of the drippings.  I usually flip up the end a little to get it to extend out a little more.  I have also been taking a little outdoor table and sitting it in front of the smoker and placing a disposable full size hotel pan under the racks when I am done so I have a work table.

I have not figured out exactly how I will do it yet, but I plan to put in a sliding shelf under the front of the smoker that will extend out like a drawer would.  This create a place for me to work as well as catch those pesky drippings.  I like the side tables on the cart, but I would prefer one right in front under the drip pan attached to the smoker so I could extend it out and slide it back underneath when not in use.  I there is not really a place to attach drawer slides to the side of the cart without attaching another piece of material to the stainless steel sides of the cart.

I really like the stainless steel cart from Smokin-it, but the sides tables are not terribly sturdy. I am always afraid I am going to knock into it and collapse a side table by accident. 

Ill see what I can come up with over the next couple weeks.  Idea's and suggestions welcome.

You could lay full extension slides on their side and screw them to each of the crossmembers on front and back of cart, then mount a simple pan to the slides. This could be bent and riveted or you could weld the corners. Then line with foil or drop a disposable hotel pan and viola!

 
Welcome onelbil.  Your suggestion sounds feasible, but in my opinion, a little bit of overkill.  I didn't comment on the foil out the front method before, but since you mentioned it again, I just have to throw my nickels-worth in. 

If you properly foil the bottom of the smoker, remember to poke a hole in the foil over the air/drain hole, and have your catch pan in place, you will rarely get liquid coming out the front.  If you do, there is a catch pan just below the door, with its own drain hole that feeds into the catch pan.  If you get a lot of liquid out the door seal, it's likely the bottom wasn't foiled properly, or a hole wasn't poked in the foil.  I've done many smokes in these, and have never had juices drip off the front ledge.

If you have a Smokin-It smoker, go on over to the Introductions section and tell us about yourself!  Heck, go there even if you don't have one!  We like to get to know our new friends! ;D
 
Hi all
I want to bypass the temp from my si3 with an auber unit. Are the two female disconnects from the thermostat at the top of the box?
 
Polish Q said:
Okay ... for now this is all I have ... However I will take photos this weekend to show this mod I am about to apply to my SI3!!!!

Polish Q, I like what you did with the bypass, great job. I am thinking of doing the same. Is this the toggle needed?

http://www.allelectronics.com/make-a-store/item/sts-60/dpdt-c-off-heavy-duty-toggle-switch/1.html

Ernie
 
Pretty much... I don't have on off on.... I have what I think is dpst meaning position a or position b.

This will work though.

Oh and the Auber probe on other post is the right one.
 
Back
Top