DivotMaker
New member
December 2015 Update!
We finally did it! The new Model 2D and Model 3D are now available! These smokers have an integrated PID controller, designed by Auber Instruments, so it works the same as a standalone Auber PID. Check them out here:
Product Release: Smokin-It Model 2D and 3D
Boy, am I excited!
I got my hands on a new prototype for testing - the Electronic Smokin-It Model 2! I'm grateful to Steve and Ben for giving me the opportunity to test this bad boy out!
Let me give a couple of "disclaimers" before I tell you all about it:
1. This is the FIRST prototype of the new electronic controller; there will most likely be some issues to address, but that's what this is for! We want to work-out all the "bugs" before releasing this unit.
2. I'm not a Professional Product Tester, but I did stay at a Holiday Inn Express last night.
3. Feedback/suggestions are welcome! That's another reason for this posting!
4. I just got hold of it night before last, so the pictures/videos aren't the best quality, but did the best I could with very limited time. There will be MANY more reviews to come!
5. There is a "known" issue regarding accuracy of the electronic controller. This is being addressed, and I'll be evaluating it extensively.
Okay, now that the lawyers are happy, , we can get down to business!
I unwrapped, cleaned and mounted it on the cart night before last. Last night, I was able to season the unit. Some very interesting things were discovered in those few hours, some of which I'll get into later.
Initial impressions:
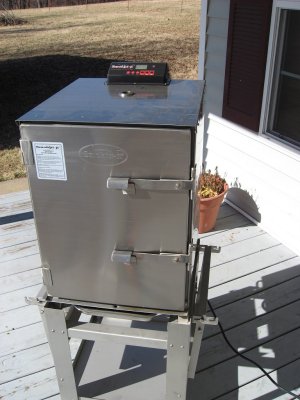
1. I have a model 1, so I was definitely impressed with the size of the model 2!
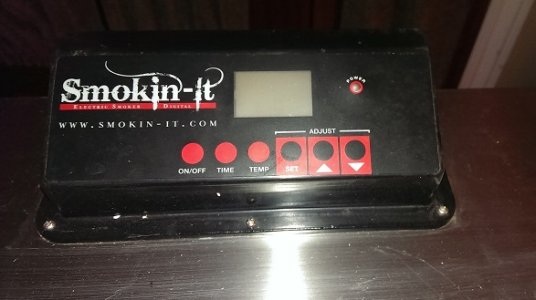
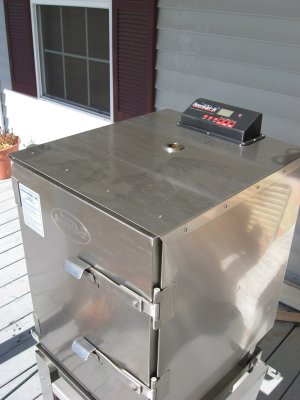
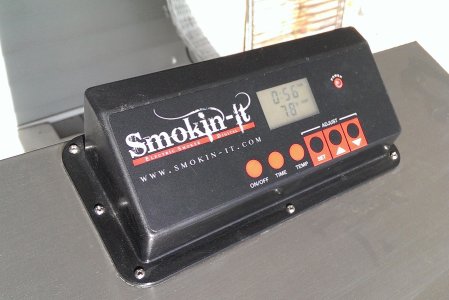
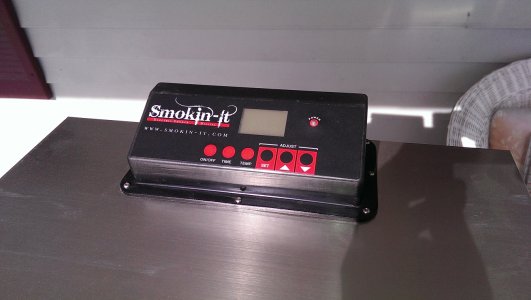
2. It is a standard model 2, in every way, except the top and controller. As you can see below, the controller is housed in a newly-designed black plastic housing. It appears to be a very heavy-duty plastic, and looks weather-proof. The buttons are "touch-sensitive" buttons, meaning you don't have to "press" on them, just gently touch. Took a minute to figure that out, but really liked it once I did.
3. I like the layout of the controls. They're simple and elegant.
4. One minor issue: When the smoker is mounted on a cart, the display is unreadable when standing directly in front of the smoker (unless you're over 6' tall). I had to step to the side a bit to read it. When the smoker is on its own wheels on the floor, it's fine.
Seasoning:
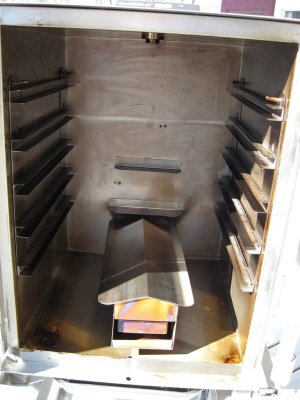
I threw a couple dowels in, and placed the Maverick on a shelf. I also added 2 1/2 bricks to the shelf to act as a "heat sink" (simulated meat...lol). I can now add hickory-smoked bricks to my repertoire! I turned the smoker on (there's an "On" button), and the display sprang to life! It has a pleasant blue backlight (which you'll see in the videos). When I touched "Time," the top "time" line started to flash. It displays in hours:minutes, so I just used the up/down keys to set 4 hours. Pressing "Set" saved the setting. I set the temp to 250 (max) the same way. Easy so far!
I was amazed at the difference in the heating elements between the model 1 and 2! The 700 watt element in the 2 is a hoss! I noticed, almost immediately, that the temp gauge on the controller was not keeping pace with the Maverick's box temp. The box temp climbed rapidly, but the controller lagged 20+ degrees behind during the run-up. See the chart, below, to see the differences.
Once the controller sensed the temp at 246 (box temp 277), it cycled the controller into maintenance mode. During the heating process, the indicator light on the controller was solid red. When it reached temp, it turned to a yellowish-green. As the box temp began to drop, the controller remained steady for some time. Eventually, I began to hear the controller start to "click" as it turned the element on and off. The light never did turn red again, as it seems the controller switches to this maintenance mode when it gets up to temp.
During the preheat to 250, I experienced something that has been written about on the site several times, but I never experienced with my model 1: The "Smoke Belch!" I've attached video of this. The first time it happened, I was standing over the smoker, looking at the controller display. Scared me so much I almost dropped my drink! Smoke spewed from every orofice in that sucker for 2-3 seconds! Out the top, around the door, and even out the bottom! Ben and I discussed this last night, and may have it figured-out - more on that later, after I test our theory.
There were no big "temp swings," like with the analog controller. The most difference I saw, and only briefly, was 9-11 degrees. Most of the time, the controller and Maverick varied by only 1-6 degrees. Not bad. It doesn't seem to be PID-accurate yet, but I know this is being addressed.
All in all, first impressions are good! I look forward to smoking some good Q, and giving you feedback in "real world" situations with food! It's a dirty job, but someone has to do it! ;D
:10 84 104
:12 91 117 Smoke begins
:14 96 124
:17 104 133
:18 107 136
:22 140 174
:25 149 183
:29 170 203
:31 177 210
:32 185 216 Big smoke belch!
:34 201 232
:35 206 237
:40 244 277
:42 246 273 Controller in maintenance mode
:44 248 271
:45 251 270
:51 251 255
:55 248 252
:56 248 250
:58 246 246
:60 246 248
:62 246 250
1:05 252 261
1:06 253 262
1:11 251 259
1:18 246 252
1:20 246 253
1:41 253 262
I stopped charting at this point. The rest of the seasoning was similar to the results after :55 minutes. The temp would go up and down, based on the controller cycling.
Videos:
The belch: https://www.dropbox.com/s/rpawls3wke2ft4v/VIDEO0012.mp4
Temps: https://www.dropbox.com/s/uspdmeuueyn9hv0/VIDEO0014.mp4
https://www.dropbox.com/s/5vz3ogg0ta9tkbq/VIDEO0015.mp4
https://www.dropbox.com/s/gkakkholpwiym3a/VIDEO0016.mp4
https://www.dropbox.com/s/yd2hy4i4ycvie5g/ESI%2018.mp4
Lots more to come - Stay Tuned!
We finally did it! The new Model 2D and Model 3D are now available! These smokers have an integrated PID controller, designed by Auber Instruments, so it works the same as a standalone Auber PID. Check them out here:
Product Release: Smokin-It Model 2D and 3D
Boy, am I excited!
I got my hands on a new prototype for testing - the Electronic Smokin-It Model 2! I'm grateful to Steve and Ben for giving me the opportunity to test this bad boy out!
Let me give a couple of "disclaimers" before I tell you all about it:
1. This is the FIRST prototype of the new electronic controller; there will most likely be some issues to address, but that's what this is for! We want to work-out all the "bugs" before releasing this unit.
2. I'm not a Professional Product Tester, but I did stay at a Holiday Inn Express last night.

3. Feedback/suggestions are welcome! That's another reason for this posting!
4. I just got hold of it night before last, so the pictures/videos aren't the best quality, but did the best I could with very limited time. There will be MANY more reviews to come!
5. There is a "known" issue regarding accuracy of the electronic controller. This is being addressed, and I'll be evaluating it extensively.
Okay, now that the lawyers are happy,
 , we can get down to business!
I unwrapped, cleaned and mounted it on the cart night before last. Last night, I was able to season the unit. Some very interesting things were discovered in those few hours, some of which I'll get into later.
Initial impressions:
1. I have a model 1, so I was definitely impressed with the size of the model 2!
2. It is a standard model 2, in every way, except the top and controller. As you can see below, the controller is housed in a newly-designed black plastic housing. It appears to be a very heavy-duty plastic, and looks weather-proof. The buttons are "touch-sensitive" buttons, meaning you don't have to "press" on them, just gently touch. Took a minute to figure that out, but really liked it once I did.
3. I like the layout of the controls. They're simple and elegant.
4. One minor issue: When the smoker is mounted on a cart, the display is unreadable when standing directly in front of the smoker (unless you're over 6' tall). I had to step to the side a bit to read it. When the smoker is on its own wheels on the floor, it's fine.
Seasoning:
I threw a couple dowels in, and placed the Maverick on a shelf. I also added 2 1/2 bricks to the shelf to act as a "heat sink" (simulated meat...lol). I can now add hickory-smoked bricks to my repertoire! I turned the smoker on (there's an "On" button), and the display sprang to life! It has a pleasant blue backlight (which you'll see in the videos). When I touched "Time," the top "time" line started to flash. It displays in hours:minutes, so I just used the up/down keys to set 4 hours. Pressing "Set" saved the setting. I set the temp to 250 (max) the same way. Easy so far!
I was amazed at the difference in the heating elements between the model 1 and 2! The 700 watt element in the 2 is a hoss! I noticed, almost immediately, that the temp gauge on the controller was not keeping pace with the Maverick's box temp. The box temp climbed rapidly, but the controller lagged 20+ degrees behind during the run-up. See the chart, below, to see the differences.
Once the controller sensed the temp at 246 (box temp 277), it cycled the controller into maintenance mode. During the heating process, the indicator light on the controller was solid red. When it reached temp, it turned to a yellowish-green. As the box temp began to drop, the controller remained steady for some time. Eventually, I began to hear the controller start to "click" as it turned the element on and off. The light never did turn red again, as it seems the controller switches to this maintenance mode when it gets up to temp.
During the preheat to 250, I experienced something that has been written about on the site several times, but I never experienced with my model 1: The "Smoke Belch!" I've attached video of this. The first time it happened, I was standing over the smoker, looking at the controller display. Scared me so much I almost dropped my drink! Smoke spewed from every orofice in that sucker for 2-3 seconds! Out the top, around the door, and even out the bottom! Ben and I discussed this last night, and may have it figured-out - more on that later, after I test our theory.
There were no big "temp swings," like with the analog controller. The most difference I saw, and only briefly, was 9-11 degrees. Most of the time, the controller and Maverick varied by only 1-6 degrees. Not bad. It doesn't seem to be PID-accurate yet, but I know this is being addressed.
All in all, first impressions are good! I look forward to smoking some good Q, and giving you feedback in "real world" situations with food! It's a dirty job, but someone has to do it! ;D
Electronic Smokin-It Model 2
“Seasoning”
1/16/14, 48-degrees ambient temp
Elapsed Time: Controller Temp: Actual Box Temp: Notes:10 84 104
:12 91 117 Smoke begins
:14 96 124
:17 104 133
:18 107 136
:22 140 174
:25 149 183
:29 170 203
:31 177 210
:32 185 216 Big smoke belch!
:34 201 232
:35 206 237
:40 244 277
:42 246 273 Controller in maintenance mode
:44 248 271
:45 251 270
:51 251 255
:55 248 252
:56 248 250
:58 246 246
:60 246 248
:62 246 250
1:05 252 261
1:06 253 262
1:11 251 259
1:18 246 252
1:20 246 253
1:41 253 262
I stopped charting at this point. The rest of the seasoning was similar to the results after :55 minutes. The temp would go up and down, based on the controller cycling.
Videos:
The belch: https://www.dropbox.com/s/rpawls3wke2ft4v/VIDEO0012.mp4
Temps: https://www.dropbox.com/s/uspdmeuueyn9hv0/VIDEO0014.mp4
https://www.dropbox.com/s/5vz3ogg0ta9tkbq/VIDEO0015.mp4
https://www.dropbox.com/s/gkakkholpwiym3a/VIDEO0016.mp4
https://www.dropbox.com/s/yd2hy4i4ycvie5g/ESI%2018.mp4
Lots more to come - Stay Tuned!


