DivotMaker
New member
These instructions are for bypassing the stock controller, but does not include a switch. This bypass uses blade connections on a short "splicing bridge" wire, so it can be easily reversed, should you choose to do so. Wear latex or nitrile gloves - the insulation is very itchy! This procedure only takes 10-15 minutes.
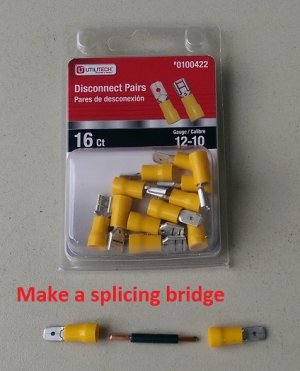
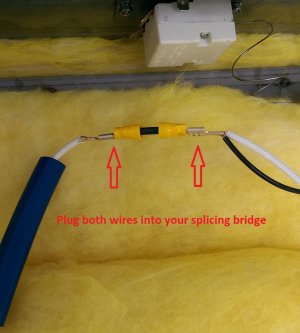
I started with a 2" length of #12 wire, and 2 blade connectors. These were crimped in place, completing the splicer. 14-guage wire will also be fine for the bridge.
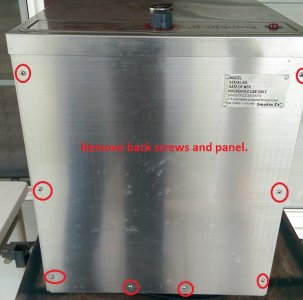
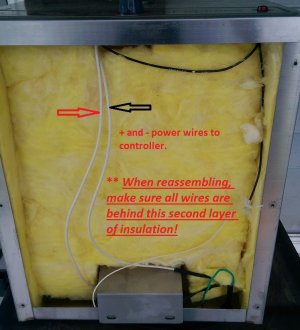
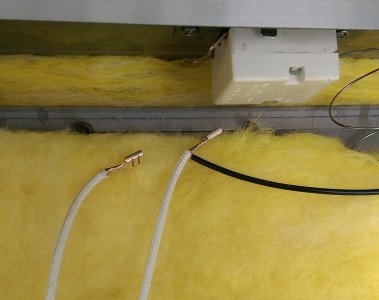
Next, remove the back of the smoker. There are 3 layers of insulation, so you'll remove the first layer only. Notice, in the photo, that all the wires are beneath the first (outer) layer of insulation. Make sure they are all in this layer during reassembly!
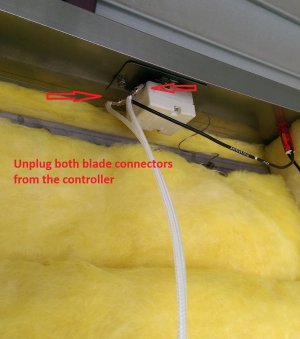
I removed the middle layer, for photo purposes, so you can see the controller better. It is not necessary to remove this layer; just unplug the two wires from the controller.
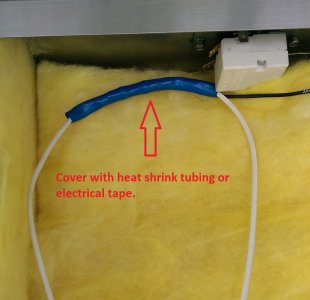
Simply connect the two wires from the controller together, using your splicing bridge. Then, use heat shrink tubing or electrical tape to cover the splice. (The piece of tubing I had was a little large, but it was all I had on hand). It doesn't have to be water-tight, just covered. To test your bypass, plug the smoker in directly. The light on top should light, and the element should start to heat. If it doesn't, something is wrong.
Once you're sure it works, keep the splice up high, and replace the outer layer of insulation. Replace the back panel.
You have now bypassed your controller, so the Auber will be in complete control of your element!
I started with a 2" length of #12 wire, and 2 blade connectors. These were crimped in place, completing the splicer. 14-guage wire will also be fine for the bridge.
Next, remove the back of the smoker. There are 3 layers of insulation, so you'll remove the first layer only. Notice, in the photo, that all the wires are beneath the first (outer) layer of insulation. Make sure they are all in this layer during reassembly!
I removed the middle layer, for photo purposes, so you can see the controller better. It is not necessary to remove this layer; just unplug the two wires from the controller.
Simply connect the two wires from the controller together, using your splicing bridge. Then, use heat shrink tubing or electrical tape to cover the splice. (The piece of tubing I had was a little large, but it was all I had on hand). It doesn't have to be water-tight, just covered. To test your bypass, plug the smoker in directly. The light on top should light, and the element should start to heat. If it doesn't, something is wrong.
Once you're sure it works, keep the splice up high, and replace the outer layer of insulation. Replace the back panel.
You have now bypassed your controller, so the Auber will be in complete control of your element!
Attachments
-
 2014-06-29 10.07.57.jpg90.8 KB · Views: 1,072
 -
 2014-06-29 10.12.18.jpg171.6 KB · Views: 967
 -
 2014-06-29 10.13.28.jpg156.7 KB · Views: 995
 -
 2014-06-29 10.13.56.jpg193 KB · Views: 1,260
 -
 2014-06-29 10.15.48.jpg181 KB · Views: 1,301
 -
 2014-06-29 10.16.33.jpg137.7 KB · Views: 1,249
 -
 2014-06-29 10.17.24.jpg198.8 KB · Views: 1,299
 -
 2014-06-29 10.21.39.jpg157.7 KB · Views: 1,288
")