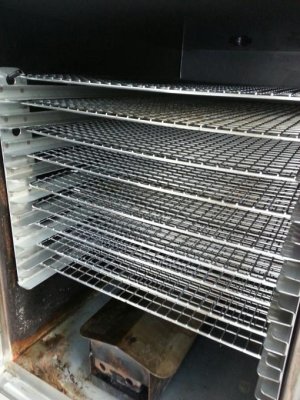
New shelf rails with alternative jerky/fish racks

Whidbey Rick

New member
Hello!!

I just installed my new "side rail assembly" shelf rails and they look great! I also found some alternative racks for jerky and seafood that fit nicely in the #3.

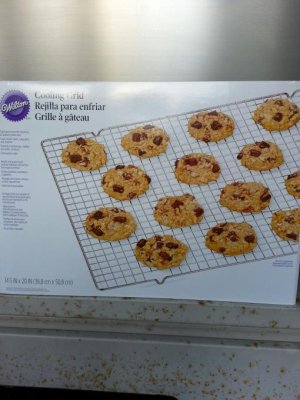
Note that the cooling racks have raised feet that can fit "above" the rail slots on both the 5 and the 9 shelf rails. I also bent the feet inward and hammered them flat on a couple of shelves and then they'll fit the normal slots. Just bending them tends to break them off, so just bending them a little and hammering them works a bit better. They worked either way modified or not.

Thought I'd share the pics.


Attachments

  • New shelf rails.jpg
    New shelf rails.jpg
    73.7 KB · Views: 453
  • Cooling racks.jpg
    Cooling racks.jpg
    52.3 KB · Views: 368
Hey Rick, this is interesting, where did you get the cooling racks? Did you purchase them online or locally? Very good idea. And welcome from Kansas City.
 
That bets the heck out of $30 a pop from SI. I was lucky on my #1 I made my own. I found a local company that gave me the SS bars that was food grade. I also found another company that I purchased the SS mesh from. Mine averaged out to about $15. But, did not have to pay any shipping. For my #3 I may get some of those trays like you have. Have your tried heating the feet and bending them over? That might keep them from breaking. I know my SS bars was just 3/16" thick and I could bend it with ease.
 
Yep, I tried to heat them and bend them but the feet broke off. I had the best luck just bending them slightly in a vice then hammering them down. This warps the sheet a bit but it's easy enough to straighten out. I think think the racks are made of chromed wire of some sort... certainly not stainless...

Rick
 
Hey Rick, 1st got to ask, are you former Marine? As the Semper Fi in the signature line. I was Navy during Viet Nam era. Ok back to subject at hand. I thought they would have bent over with some heat. Not going cherry color, but enough to bend them easy. Oh well, I have the vice so that is not a problem and a very large hammer, around the 4# range. That should do it. lol
 
Yep, did 21 years in the USMC  :)

I think the racks are pretty cool considering the price. I've used them to make jerky and they did well. I hope to get lots of use out of them to smoke Pink salmon as the run should start any day now here in the PNW.

Rick
 
Hey Rick, First and foremost thank-you for your service. I did a lot of close work with Recon Marines at my second duty station. Are you running you #3 with or without an Auber? After a mishap on my #1, I have an Auber for it as well. If you decide to get an Auber, go to this web site as this is their site and a little less than what Steve sells for. http://www.auberins.com/  Also get the permanent wall mount. It is pretty easy to install, along with a switch. Just something I did over that last couple of days. And really the #3 is far easier than my #1. The #3 has more working room.
 
Thanks for the kudos and thank you for your service also! I did buy the Auber and the permanent wall mount from their site but have not yet installed it... Just another unfinished project at the homestead...lol

Rick

 
Thank you both for your service! Welcome from Texas Rick! We're a friendly bunch so jump,right in and don't be shy. Those look like good racks especially for the price. I'll check them out. Thanks for sharing the info. Happy smokin!
 
I piddled with mine, but to be very honest you can do the wall mount install in about 15 min. Insulation does not bother me so did not wear gloves or long sleeve shirt. I did purchase a 5/16 and 1/2 Dewalt titanium drill bits. Get the ones that also have the starter point. SS is a PITA to drill in, also you will need a plastic nylon sleeve, this you can find in the hardware section speciality drawers at Lowe's. I took the permanent wall mount with me and found the right size. You will also need 3 feet of 14 awg gauge wire. And a dpdt on-on toggle switch. If you install the switch to the left of the light on top of the smoker you really will not more than a foot of wire. Once you have your supplies is pretty easy. You can follow the instructions in the Auber instruction of the forum. I put mine 1 1/2 inch from the top wall and just left of the center back support.
 
I found similar rack made by LEM at Bass Pro Shop if anyone is interested. Shown here in my previous post.

http://smokinitforums.com/index.php?topic=2008.0
 
DivotMaker said:
What's the dimensions of the cooling racks, Rick?  Great idea!
According to the fine print in the second picture, 14.5" X 20". 

Dang, I'm wanting some cookies, bad!!! 
 
WOW! Great find! I have that shelf rail holder too, it is very cool. Not sure how much Jerky I can stack in it yet, but i will find out! :)
 
Smokster said:
I found similar rack made by LEM at Bass Pro Shop if anyone is interested. Shown here in my previous post.

http://smokinitforums.com/index.php?topic=2008.0
Hey Tony, could not find them at my local Bass Pro..  :( I also have a Midland hardware store close to my house. Going to see if they have the racks tomorrow.
 
SuperDave said:
DivotMaker said:
What's the dimensions of the cooling racks, Rick?  Great idea!
According to the fine print in the second picture, 14.5" X 20". 

Dang, I'm wanting some cookies, bad!!!

Holy cow, Dave!  Guess you have better eyes than I do!  Thanks!
 
DivotMaker said:
SuperDave said:
DivotMaker said:
What's the dimensions of the cooling racks, Rick?  Great idea!
According to the fine print in the second picture, 14.5" X 20". 

Dang, I'm wanting some cookies, bad!!!

Holy cow, Dave!  Guess you have better eyes than I do!  Thanks!
Hey Tony looks like they are just an inch shorter than what Steve sells. I like the fact am saving shipping costs by picking them up locally..
 
Back
Top